
Generating New Steps
Tasks comprise a series of steps that are planned to run consecutively. Some of the steps are such that if they fail for some reason –the selected interface will stop running. In other cases, the rest of the steps can still be valid despite a problem in the execution of one or more steps. Make sure you have all the necessary information and have planned out the complete order of execution prior to defining the specific steps in the task.
The fields in the first part of the Step page are identical for all the various possible steps.
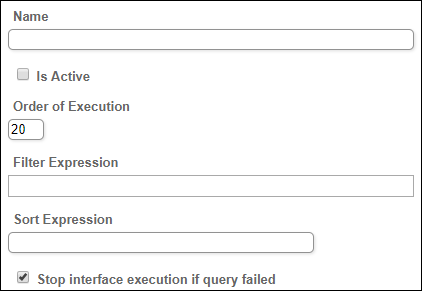
A New Step Window
The following table describes these fields for all types of steps:
| Field | Description |
|---|---|
|
Name |
Provide a step name that will help you to easily interpret and navigate the step. |
|
Is Active |
Select to engage the scheduler. The Scheduler will include this Step only when this checkbox is selected. |
|
Order of Execution |
Enter the order in which this step is to be executed. This number indicates the new step's place in the order in which the steps are executed. There can be gaps between the numbers (10, 20, 30). |
|
Filter Expression |
(Optional) Use to filter the data from the source database. When you define a filter expression, the system filters the data arriving from the source database prior to inserting it into the Schema table. |
|
Sort Expression |
(Optional) Use to sort the data from the source database. When you define a sort expression, the system sorts the data arriving from the source database prior to inserting it into the Schema table. |
|
Stop Interface Execution if the Query Failed |
Select if this step is crucial to the task. |
To Create a New Step
- Select Interfaces> {Specific Interface} >Tasks>{Specific Task}>Steps in the Navigation Pane.
- Click New. The File menu opens in a new window, listing the types of steps that are available.
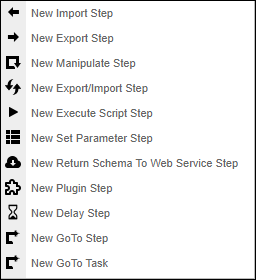
A List of Steps
- Select a needed step. The selected Step page opens.
- In the Name box, enter a relevant name for the new step.
- Click Is Active to activate the step (optional).
- In the Order of Execution box, enter the appropriate number. This number indicates the new step place in the order in which the steps are executed.
- In the Filter Expression box, enter a relevant filter (optional).
- In the Sort Expression box, enter a relevant sorting command (optional).
- Click Stop Interface Execution if query failed to enable this option (optional). At this point, each type of step has its own fields.